Blog
How Big Is 8 Inches? A Complete 2026 Guide to Understanding the Actual Size

When people ask “How big is 8 inches?”, they usually want a simple way to visualize the measurement in everyday life. While 8 inches may sound straightforward, understanding its actual length can be much easier when we compare it with familiar objects, convert it into other measurement units, and see how it relates to common items.
In standard measurement, 8 inches equals two-thirds of a foot, approximately 20.32 centimeters, or 203.2 millimeters. Whether we are measuring an object, choosing a product size, completing a DIY project, or simply trying to imagine a specific length without a ruler, knowing what 8 inches looks like can be extremely useful.
This detailed guide explains exactly how big 8 inches is, how to visualize it, how it compares with common objects, and how to convert it into centimeters, feet, and other units.
How Long Is 8 Inches Exactly?
An inch is a standard unit of length commonly used in the United States and several other measurement contexts. Therefore, an object that is 8 inches long measures exactly eight individual one-inch sections placed end to end.
The precise metric conversion is:
8 inches = 20.32 centimeters
It also equals:
- 203.2 millimeters
- 0.6667 feet
- 0.2222 yards
- Approximately 0.203 meters
- Two-thirds of one foot
Because one foot contains 12 inches, we can calculate the relationship easily. Eight divided by twelve equals approximately 0.67, meaning 8 inches is about two-thirds the length of a standard foot.
This makes 8 inches a moderately sized measurement. It is longer than the width of many smartphones but shorter than a standard sheet of printer paper when measured along its longest side.
What Does 8 Inches Look Like in Real Life?
The easiest way to understand how big 8 inches is is to compare it with objects we encounter every day. Measurements can be difficult to imagine as numbers alone, but familiar visual references provide a much clearer picture.
For example, 8 inches is approximately the length of a standard pencil when comparing the measurement to many common full-size pencils. Pencil lengths vary, so not every pencil will measure exactly 8 inches, but a typical wooden pencil offers a useful visual reference.
Another helpful comparison is a standard sheet of letter-size paper. In the United States, letter-size paper measures 8.5 inches wide and 11 inches long. Therefore, 8 inches is only half an inch shorter than the width of that paper.
We can also imagine 8 inches as a length slightly shorter than the width of an ordinary sheet of copy paper. If we place a ruler along the shorter edge of letter-size paper, the 8-inch point would appear very close to the opposite edge.
Other approximate comparisons include:
- A large kitchen knife blade may be around 8 inches long.
- Some tablets measure approximately 8 inches across their screen diagonal.
- A typical full-size pencil is close to this length.
- Two standard 4-inch objects placed end to end equal 8 inches.
- Eight individual 1-inch sections placed together create an 8-inch length.
These comparisons help us develop a practical mental image of how long eight inches actually is.
How Big Is 8 Inches in Centimeters?
One of the most common questions involves converting inches to centimeters. This is especially important because many countries use the metric system, where centimeters and meters are more familiar than inches and feet.
The exact conversion is based on the international definition:
1 inch = 2.54 centimeters
To convert 8 inches into centimeters, we multiply:
8 × 2.54 = 20.32 centimeters
Therefore:
8 inches = 20.32 cm
For practical purposes, we can round this measurement to 20.3 cm.
This means that if a product description says an item is 8 inches long, it is approximately 20 centimeters long. That comparison can be particularly useful when shopping internationally because one website may list dimensions in inches while another uses centimeters.
It is important to remember that 20 cm is slightly shorter than 8 inches. Since the exact measurement is 20.32 cm, rounding can make a small difference when precise sizing matters.
How Big Is 8 Inches Compared With a Ruler?
A standard ruler is one of the clearest ways to understand this measurement. Most school rulers and office rulers measure 12 inches long, which is equal to one foot.
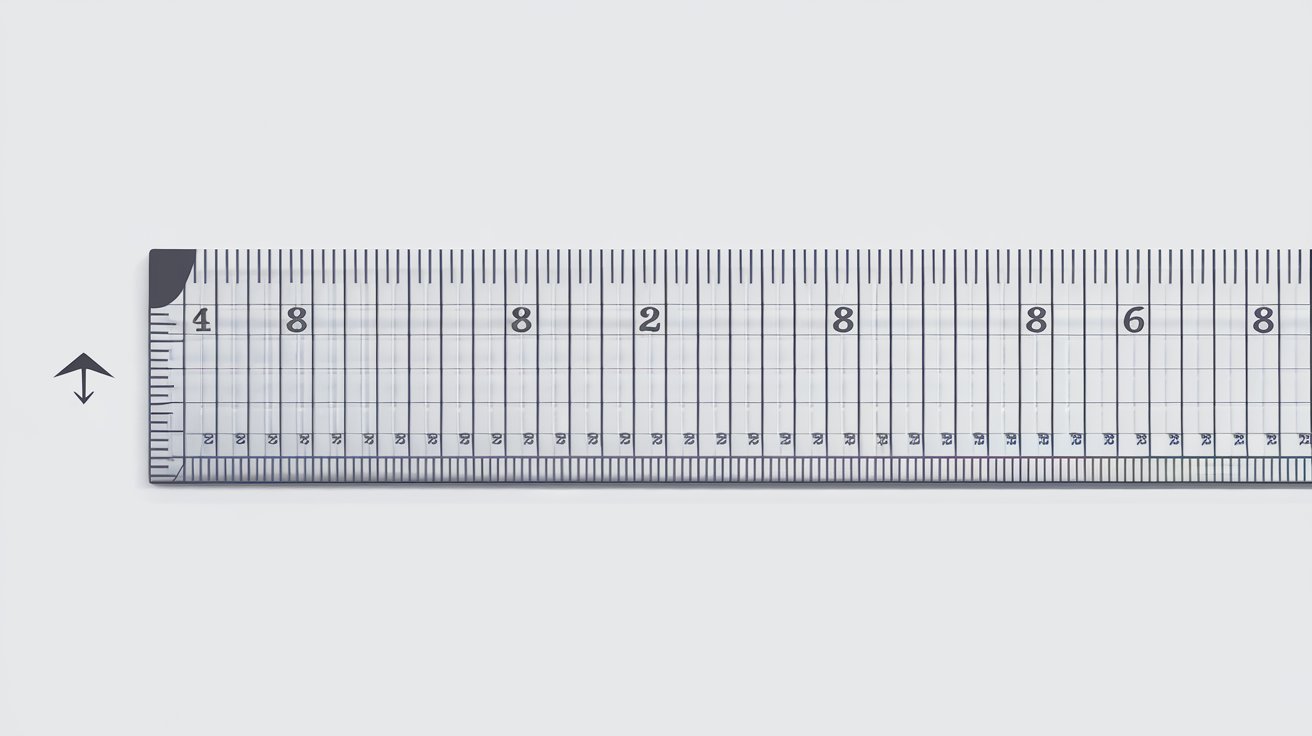
If we look at a 12-inch ruler, the 8-inch mark is located two-thirds of the way from the zero mark to the 12-inch end.
In other words:
12 inches = 1 foot
8 inches = ⅔ of a foot
If we divide a ruler into three equal sections of 4 inches each, the first section covers 0 to 4 inches, the second covers 4 to 8 inches, and the final section covers 8 to 12 inches. Therefore, the 8-inch mark appears exactly at the point where the final one-third of the ruler begins.
This is an excellent way to visualize the size. An 8-inch object would cover most of a standard 12-inch ruler, leaving only 4 inches uncovered.
When measuring something with a ruler, we should begin at the zero mark, not necessarily at the physical edge of the ruler. Some rulers have a small gap before the zero mark, so starting from the wrong point can produce an inaccurate measurement.
How Big Is 8 Inches in Feet and Other Units?
Understanding 8 inches in different units makes the measurement easier to use in various situations.
Since there are 12 inches in one foot, we calculate:
8 ÷ 12 = 0.6667 feet
Therefore, 8 inches equals approximately 0.67 feet, or exactly two-thirds of a foot.
The complete conversions are:
| Measurement Unit | Equivalent of 8 Inches |
|---|---|
| Centimeters | 20.32 cm |
| Millimeters | 203.2 mm |
| Meters | 0.2032 m |
| Feet | 0.6667 ft |
| Yards | 0.2222 yd |
These conversions are useful in construction, design, education, online shopping, and international product measurements.
For example, if a piece of material is listed as 0.203 meters long, that is equivalent to exactly 8 inches. Similarly, a dimension of 203.2 millimeters represents the same length.
How Can We Measure 8 Inches Without a Ruler?
Sometimes we need to estimate 8 inches without having a ruler available. While estimation will not provide perfect accuracy, several everyday objects can help us get reasonably close.
One practical method is to use an 8.5-inch-wide sheet of U.S. letter-size paper. Since 8 inches is only half an inch shorter than its width, we can use the paper as a visual reference and estimate slightly less than the full width.
A standard pencil can also provide a rough comparison. Many common pencils are close to 7.5 to 8 inches long, although the exact length depends on the brand and whether the pencil has been sharpened.
We can also estimate the length by dividing a known object into sections. For example, if we know an object is 4 inches long, placing two of those lengths end to end gives us 8 inches.
However, body-based estimates are less reliable because hand and finger sizes vary significantly from person to person. We should use them only for rough approximations and not for projects requiring precise dimensions.
For accurate work involving DIY projects, furniture, clothing, construction, or product specifications, a ruler or measuring tape remains the best option.
Common Things That Are About 8 Inches Long
Visual comparisons are often more useful than mathematical conversions. Here are several examples of things that may be approximately 8 inches long, depending on their exact design or size:
A full-size pencil: Many standard pencils are close to 8 inches in length when new.
An 8-inch tablet: The screen measurement usually refers to the diagonal distance across the display, not necessarily the width or height of the device.
An 8-inch cake pan: In baking, an 8-inch round pan usually refers to its diameter from one side to the other.
A chef’s knife blade: Many kitchen knives are sold with an 8-inch blade, measured from the blade’s base to its tip.
Part of a standard ruler: On a 12-inch ruler, 8 inches covers approximately two-thirds of its total length.
These examples also show why it is important to understand how a measurement is being used. An 8-inch screen, an 8-inch cake pan, and an 8-inch knife do not necessarily have the same overall physical dimensions because the measurement may refer to a diagonal, diameter, blade length, width, or another specific part.
Why Understanding the Size of 8 Inches Matters
Knowing exactly how big 8 inches is can help us make better decisions when measurements appear in product descriptions, instructions, and technical specifications.
When shopping online, a product may appear larger or smaller in photographs than it is in reality. Understanding that 8 inches equals 20.32 cm allows us to compare the listed dimension with a ruler, a sheet of paper, or familiar objects before making a decision.
The measurement is also common in cooking, home improvement, electronics, furniture, packaging, and crafts. An 8-inch measurement may describe the diameter of a baking pan, the length of a tool, the size of a display, or one dimension of a storage item.
We should always check which dimension the 8 inches refers to. Length, width, height, depth, diameter, and diagonal measurements can produce very different physical impressions. An object described simply as “8 inches” does not tell us everything unless we know exactly what part of the object is being measured.
Conclusion: How Big Is 8 Inches?
So, how big is 8 inches? The exact answer is 20.32 centimeters, 203.2 millimeters, or approximately two-thirds of a foot. On a standard 12-inch ruler, it extends from the zero mark to the number 8, covering roughly two-thirds of the ruler’s total length.
For everyday visualization, we can think of 8 inches as approximately the length of a standard pencil and slightly shorter than the 8.5-inch width of U.S. letter-size paper. These comparisons make the measurement much easier to picture without immediately reaching for a ruler.
Whether we are checking product dimensions, measuring materials, selecting an 8-inch baking pan, or converting inches into centimeters, understanding this simple measurement gives us a practical and accurate reference point.
Frequently Asked Questions About How Big 8 Inches Is
Is 8 inches the same as 20 cm?
Not exactly. 8 inches equals 20.32 centimeters. Therefore, 20 cm is slightly shorter than 8 inches.
How many feet is 8 inches?
8 inches equals two-thirds of a foot, or approximately 0.6667 feet.
How many millimeters is 8 inches?
8 inches equals exactly 203.2 millimeters.
What everyday object is about 8 inches long?
A standard full-size pencil is often close to 8 inches long, making it a useful approximate visual comparison.
Where is 8 inches on a 12-inch ruler?
The 8-inch mark is two-thirds of the way along a standard 12-inch ruler, leaving 4 inches between the 8-inch mark and the end at 12 inches.
Is an 8-inch screen actually 8 inches wide?
Usually, no. For televisions, monitors, and tablets, the stated screen size commonly refers to the diagonal measurement from one corner of the display to the opposite corner.
Hanging Hardie siding is a popular way to improve a home’s exterior with a durable, attractive, and relatively low-maintenance cladding system. James Hardie siding is made from fiber cement, a material designed to provide the appearance of traditional wood siding while offering strong resistance to moisture, pests, and everyday weather exposure. However, achieving a professional result requires more than simply attaching boards to a wall.
Whether we are planning a complete exterior renovation or replacing damaged siding, understanding the correct Hardie siding installation process, fastening requirements, starter strips, flashing, spacing, cutting, and finishing details is essential. James Hardie recommends that full siding installations be handled by experienced siding professionals because correct installation directly affects appearance, durability, and warranty protection.
What Is Hardie Siding and Why Is Proper Hanging Important?
Hardie siding commonly refers to James Hardie fiber cement siding, including products such as HardiePlank lap siding, HardiePanel, HardieShingle, and related trim products. Among these, HardiePlank lap siding is especially recognizable because individual horizontal boards overlap to create a traditional siding appearance.
Unlike lightweight vinyl siding, fiber cement siding is a substantial building product that must be supported and fastened correctly. Proper hanging ensures that each plank remains aligned, securely attached, and capable of handling normal expansion, contraction, wind, and moisture exposure.
Hardie siding is also marketed for its durability and low-maintenance characteristics. James Hardie states that its siding is noncombustible and designed to resist moisture-related damage and pests such as termites and woodpeckers. Its current product information also lists a 30-year non-prorated limited, transferable substrate warranty for applicable siding products.
What We Need Before Hanging Hardie Siding
A successful installation begins before the first plank reaches the wall. We should inspect the existing exterior, framing, sheathing, and moisture-management system before installing new siding. Any damaged sheathing or structural problems should be corrected first.
The wall should have the appropriate water-resistive barrier (WRB) and flashing system installed according to the product instructions and local building requirements. James Hardie’s installation guidance emphasizes that the exact instructions can vary by product and climate zone, so we should always use the current instructions applicable to the specific siding being installed.
Useful tools include a tape measure, level, chalk line, speed square, smooth-faced hammer, siding or pneumatic nailer, appropriate cutting equipment, and a lap gauge. James Hardie notes that pneumatic fastening equipment is highly recommended by professionals, although products can also be hand-nailed when the specified installation requirements are followed.
Safety is particularly important when cutting fiber cement. We should follow the manufacturer’s cutting and dust-control recommendations and use appropriate personal protective equipment.
How to Hang HardiePlank Lap Siding Step by Step
The installation sequence is important because each course of siding depends on the one beneath it.
First, we install the starter strip at the bottom of the wall. James Hardie explains that HardiePlank lap siding requires a starter strip beneath the first course. A starter can be made from an appropriate ripped section of HardiePlank or another approved option.
Next, we install the first course while maintaining the specified alignment and clearances. A perfectly level first course is critical because even a small error at the bottom can become increasingly visible as additional rows are installed.
After the first row is secured, subsequent boards are positioned so that they overlap consistently. We should use a level and chalk lines to maintain straight courses. For long walls, butt joints need careful planning. James Hardie recommends staggering joints between successive courses rather than creating a repetitive vertical pattern.
Each plank should be fastened according to the current Hardie installation instructions, including the specified nail type, location, spacing, and penetration. Hardie states that approved corrosion-resistant, galvanized, or stainless-steel fasteners should be used, with spacing determined by the applicable requirements and wind-load tables.
Blind Nailing, Face Nailing, and Fastener Placement
One of the most important decisions when hanging Hardie siding is the fastening method. Blind nailing is James Hardie’s preferred technique for many applications because the fasteners are concealed by the overlapping course above. This creates a cleaner, more seamless appearance.
However, face nailing may be required in certain applications, particularly where local building codes or high-wind conditions dictate it. We should never choose a fastening pattern simply because it looks convenient. The appropriate method depends on the product, climate zone, wall construction, wind requirements, and local code.
Fasteners should also be driven correctly. Overdriving can damage the siding, while underdriving can interfere with the overlapping course and finished appearance. James Hardie specifically recommends using fasteners approved for its products and following the applicable installation requirements.
Flashing, Butt Joints, Corners, and Windows
Good moisture management is just as important as fastening. Butt joints between siding boards are areas where water could potentially enter if they are installed incorrectly.
James Hardie recommends flashing behind lap-siding butt joints and gives guidance involving 6-inch-wide flashing with a 1-inch overlap onto the course below, while also noting that local codes may require different dimensions. The flashing should be waterproof, durable, and compatible with cement-based products.
Windows, doors, inside corners, outside corners, and other transitions require equally careful detailing. We should follow the specific manufacturer’s instructions rather than improvising gaps or sealant locations.
In 2026, James Hardie is also promoting its Trim-Over™ installation method, in which siding is installed before certain trim components. The method can reduce the amount of caulking required and is presented by James Hardie as an approved installation approach for applicable products.
Common Mistakes When Hanging Hardie Siding
Several installation mistakes can reduce the quality and longevity of a Hardie siding project. One common problem is failing to establish a perfectly level first course. Another is using the wrong nails, incorrect fastening positions, or improper spacing.
We should also avoid creating a continuous vertical line of butt joints. Proper staggering produces a more natural appearance and can help distribute joints across the wall. Another frequent mistake is ignoring flashing around joints, windows, doors, and transitions.
Cutting and handling deserve attention as well. Fiber cement can be damaged by careless handling, and finished ColorPlus® Technology products should be protected from unnecessary scratching and marring during installation. James Hardie recommends specific handling practices, including leaving protective laminate in place during certain cutting and fastening operations and removing it after installation.
Finally, using generic installation instructions for the wrong product or climate zone can create problems. We should always verify the exact Hardie product, installation guide, climate zone, and local building code before beginning.
Is Hanging Hardie Siding a DIY Project?
Technically, some homeowners with advanced construction experience may be capable of installing fiber cement siding. However, full-house Hardie siding installation is considerably more demanding than many basic DIY siding projects.
The material is heavier and less forgiving than some alternatives, and details involving flashing, fasteners, joints, windows, corners, and moisture management must be executed correctly. James Hardie specifically says that a full Hardie siding project is best undertaken by siding experts who understand fiber cement installation.
For a complete home, hiring an experienced installer can reduce the risk of alignment problems, damaged boards, water intrusion, improper fastening, and warranty complications. James Hardie says a typical siding installation can take approximately seven to 14 days, depending on the home’s size and whether repairs are required before installation.
Conclusion
Hanging Hardie siding correctly requires careful preparation, accurate measurements, proper starter strips, consistent overlaps, approved fasteners, correct flashing, and attention to moisture management. The quality of the installation is just as important as the quality of the siding itself.
For homeowners considering a 2026 exterior renovation, Hardie siding offers a combination of durability, low maintenance, curb appeal, and fiber-cement performance. By following the manufacturer’s current instructions and local building codes—and using an experienced installer when appropriate—we can achieve a clean, secure, and long-lasting exterior.
Frequently Asked Questions
1. Can we install Hardie siding ourselves?
Some experienced DIYers may be able to handle portions of the work, but James Hardie recommends experienced siding professionals for complete installations because fiber cement requires specialized installation knowledge.
2. What is the best way to hang HardiePlank siding?
For applicable installations, blind nailing is James Hardie’s preferred technique because the fasteners are concealed by the overlapping siding course. Exact fastening requirements must follow the product’s installation guide.
3. Does Hardie siding need a starter strip?
Yes. HardiePlank lap siding requires a starter strip beneath the first course.
4. Does Hardie siding require flashing?
Yes. Proper flashing is an important part of moisture management, including at siding butt joints and around relevant wall penetrations. The exact requirements depend on the product and local code.
5. How long can Hardie siding last?
Applicable Hardie siding products are backed by a 30-year non-prorated limited, transferable substrate warranty, although actual service life depends on installation, climate, maintenance, and other conditions.
Blog
Anne Kolb Center: Complete Guide to Trails, Wildlife, Kayaking, Tower, Aquarium, and 2026 Visits
The Anne Kolb Center is one of the most distinctive nature attractions in Hollywood, Florida, offering visitors an opportunity to explore a large coastal mangrove ecosystem just minutes from the area’s famous beaches. Located at 751 Sheridan Street in Hollywood, the center operates within West Lake Park and provides access to mangrove habitats, nature trails, an observation tower, an exhibit hall, kayaking opportunities, fishing, educational programs, and community events.
Covering approximately 1,500 acres, the surrounding West Lake Park protects an important coastal wetland ecosystem. The site combines outdoor recreation with environmental education, making it suitable for families, photographers, bird-watchers, paddlers, students, and anyone looking for a quieter natural experience away from the busy beachfront.
What Is Anne Kolb Nature Center?
The Anne Kolb Nature Center is a nature and environmental education facility located inside West Lake Park in Hollywood, Florida. The property protects a substantial coastal mangrove estuary, providing habitat for plants, fish, birds, and other wildlife.
The nature center is named after Anne Kolb, an environmentalist who played an important role in helping preserve the area’s coastal mangrove wetlands from development. The Friends of Anne Kolb organization notes that her conservation efforts were instrumental in protecting the park.
The facility opened in 1996 after several years of planning and became one of the largest nature-center properties in the Broward County park system. County planning documents describe the site as approximately 1,501 acres, with mangrove communities extending along the Intracoastal Waterway.
Rather than being simply an indoor museum, Anne Kolb combines a nature center with an extensive outdoor landscape. Visitors can explore trails, view wildlife, climb the observation tower, visit the aquarium, paddle through mangrove waterways, and participate in educational activities.
Anne Kolb Nature Center Trails and Wildlife
One of the biggest attractions is the network of nature trails and boardwalks winding through the mangrove environment. The trails provide an accessible way to experience South Florida’s coastal ecosystem without needing a boat.
The current nature-center information describes almost five miles of combined boardwalk, paved, and shellrock trails, while other park materials describe approximately three miles of traditional nature trails. The difference reflects the way trail segments, loops, and park routes are counted, but the important point for visitors is that there are multiple routes through the mangrove landscape.
Wildlife sightings can include wading birds, fish, crabs, mangrove-associated species, and other South Florida wildlife. Visitors have reported seeing species such as ibises, ospreys, and little blue herons around the trails and wetlands.
The environment is particularly appealing to people interested in bird-watching and nature photography. Early mornings can provide comfortable temperatures and better conditions for observing wildlife. Binoculars and a camera with a moderate telephoto lens can be useful, although even casual visitors can enjoy the scenery.
The mangroves themselves are a major attraction. These coastal plants help stabilize shorelines and provide important nursery habitat for numerous aquatic species, making the park an excellent location for learning about South Florida’s interconnected wetland ecosystem.
68-Foot Observation Tower at Anne Kolb
The 68-foot observation tower is one of Anne Kolb Nature Center’s most recognizable features. The five-level tower provides elevated views across the mangrove canopy and West Lake, with views extending toward Port Everglades in the distance.
A major advantage is accessibility. Visitors can reach the upper levels using either stairs or an elevator, making the tower useful for a wider range of visitors. The open-air viewing areas provide a completely different perspective from the trails below.
For first-time visitors, the tower can also serve as a useful orientation point. Looking over the wetlands from above makes it easier to appreciate the scale of the mangrove ecosystem.
The top level can become noticeably windy, so carrying a light layer can be useful even on a warm South Florida day. The tower is included with a normal visit rather than requiring a separate tower ticket.
Exhibit Hall, Aquarium, and Environmental Education
The indoor Exhibit Hall and EcoRoom complement the outdoor trails by explaining the ecology visitors see around them. One of the centerpieces is a 3,500-gallon saltwater aquarium containing species associated with the surrounding mangrove estuary.
Interpretive displays explain how mangrove ecosystems function and introduce visitors to the plants and animals that depend on them. For younger visitors, the EcoRoom provides hands-on activities designed to make environmental science more engaging.
The center also supports school field trips, naturalist programs, and environmental education. Broward County’s educational programming includes activities covering mangrove ecology, sea turtles, manatees, plants, animals, and guided trail experiences.
This combination makes Anne Kolb particularly useful for families. Children can learn about an ecosystem indoors and then see the same concepts outdoors on the trails.
The exhibit hall also has a history of hosting local and regional art exhibitions, creating an interesting connection between environmental education and South Florida’s artistic community.
Kayaking, Canoeing, Fishing, and Outdoor Activities
Visitors interested in getting onto the water can explore the mangrove waterways by kayak, canoe, or paddleboard. The current facility information describes marked, color-coded paddling routes through the mangrove tunnels.
Paddling provides a perspective that cannot be experienced from the boardwalks. Narrow waterways pass between mangrove vegetation, creating opportunities to observe aquatic wildlife and coastal plants at close range.
Fishing is another activity available in the park. The Intracoastal fishing pier is reached by a paved quarter-mile trail. Fishing from the pier is catch-and-release only, and visitors must have a valid Florida fishing license; licenses are not sold at the nature center.
Cyclists should also check the specific trail rules. Bicycles are permitted on the shellrock South Trail, while bicycles and skating are not permitted on the boardwalk trails.
These varied activities make the park more than a traditional walking attraction. Visitors can choose between education, wildlife observation, hiking, paddling, fishing, photography, and simply enjoying the wetlands.
Anne Kolb Nature Center Hours, Location, and 2026 Planning
The nature center and exhibit hall are currently listed as open daily from 9 AM to 5 PM, while the surrounding West Lake Park grounds and trails are listed as operating from 8 AM to 6 PM daily.
The address is:
Anne Kolb Nature Center
751 Sheridan Street
Hollywood, FL 33019
Because individual programs and special events can have different schedules and fees, visitors should check current Broward County Parks information before traveling. The county’s 2026 event listings, for example, include scheduled programs at Anne Kolb Nature Center such as the Sea Turtles and Their Babies Program.
The exhibit hall and grounds are currently described as free admission, although particular programs, rentals, or activities may involve separate fees.
For a comfortable visit, we recommend bringing water, sunscreen, insect repellent, comfortable walking shoes, binoculars, and a camera. South Florida’s weather can change quickly, so checking the forecast before visiting is also sensible.
Visitors should remember that pets are not allowed on the nature center grounds or trails.
Why Anne Kolb Nature Center Is Worth Visiting in 2026
The Anne Kolb Nature Center remains an appealing destination because it combines several experiences in one location. We can spend an hour walking the mangrove trails, climb the observation tower for panoramic views, visit the aquarium and EcoRoom, or spend substantially longer exploring the waterways and participating in educational programs.
Its location is another advantage. The center is close to Hollywood Beach, yet its mangrove environment feels dramatically different from the developed beachfront. Broward County planning information notes that the park is less than a mile from Hollywood Beach’s famous Broadwalk, making it convenient to combine a nature visit with other Hollywood attractions.
The park’s environmental importance is perhaps its greatest value. Instead of simply displaying nature behind glass, Anne Kolb allows visitors to experience a living coastal ecosystem directly.
Frequently Asked Questions About Anne Kolb Center
Where is Anne Kolb Nature Center located?
It is located at 751 Sheridan Street, Hollywood, Florida 33019, within West Lake Park.
How large is Anne Kolb Nature Center?
The surrounding West Lake Park property is approximately 1,500 acres, making it one of the largest natural park areas in the Broward County system.
Does Anne Kolb Nature Center have an observation tower?
Yes. The park has a 68-foot, five-level observation tower accessible by stairs or elevator.
Is there an aquarium at Anne Kolb Nature Center?
Yes. The exhibit hall features a 3,500-gallon saltwater aquarium containing species associated with the surrounding estuary.
Can we kayak at Anne Kolb Nature Center?
Yes. Kayaks, canoes, and paddleboards can be used to explore marked routes through the mangroves, subject to current operating arrangements.
Are pets allowed?
The current FAQ states that pets are not allowed on the nature center grounds or trails.
Is Anne Kolb Nature Center free?
The current nature-center information lists free admission to the exhibit hall and grounds, although individual programs and activities may charge fees.
Conclusion
The Anne Kolb Center is one of South Florida’s most valuable destinations for experiencing a coastal mangrove ecosystem while remaining close to Hollywood’s urban and beach attractions. Its combination of 1,500 acres of wetlands, nature trails, a 68-foot observation tower, a 3,500-gallon aquarium, environmental exhibits, kayaking, fishing, and educational programs gives visitors many different ways to explore the area.
For a 2026 visit, the center is especially appealing to families, outdoor enthusiasts, photographers, bird-watchers, students, and travelers seeking something beyond the traditional beach experience. Whether we visit for a short nature walk or spend several hours exploring the trails and waterways, Anne Kolb offers an authentic look at the mangrove wetlands and wildlife of coastal South Florida.
Blog
2025 Subaru Outback Wilderness: Complete Guide to Off-Road Capability, Features, Performance, and Technology
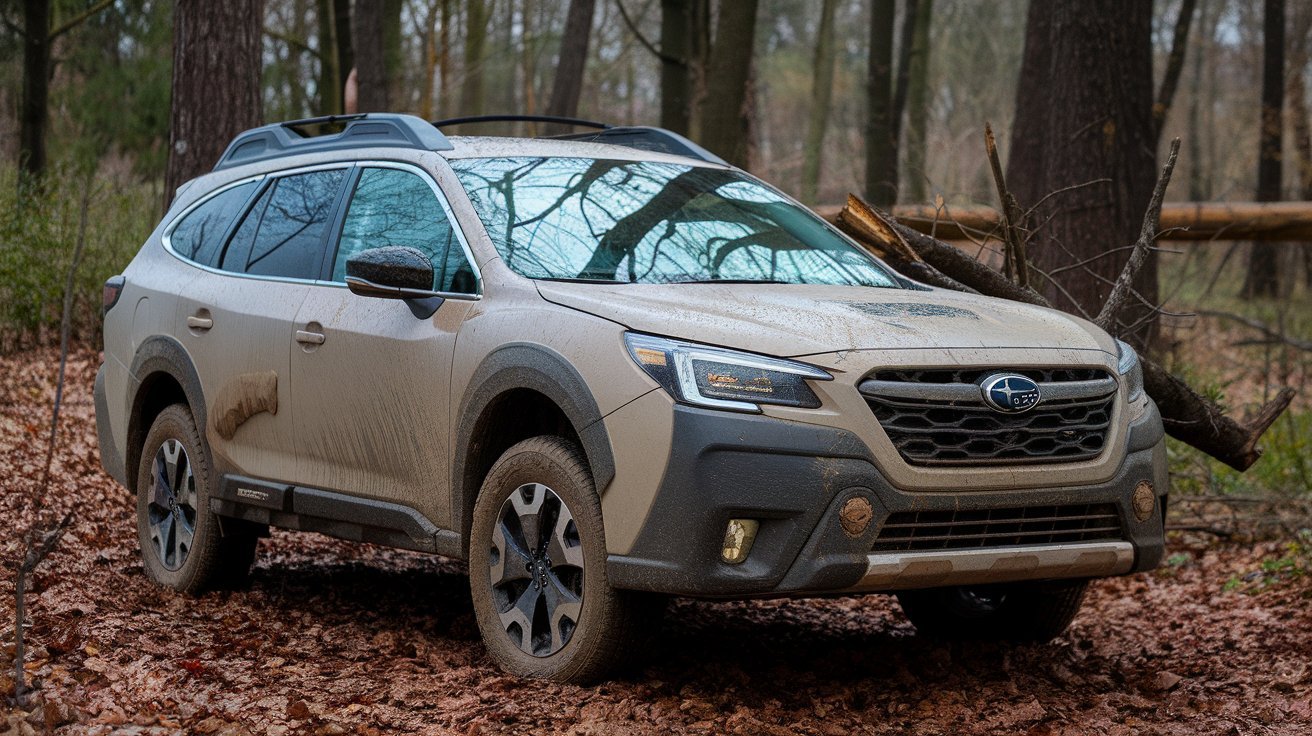
The 2025 Subaru Outback Wilderness is built for drivers who want more capability than a conventional family crossover while still expecting everyday comfort, excellent cargo versatility, and modern technology. As the most rugged version of the 2025 Outback lineup, the Wilderness combines Subaru’s standard Symmetrical All-Wheel Drive, a turbocharged engine, increased ground clearance, all-terrain tires, enhanced X-MODE, and a distinctive adventure-focused design.
For 2026 buyers considering a remaining new model or a recent used example, the 2025 Outback Wilderness remains an appealing option because it occupies a unique position between a traditional wagon and an off-road SUV. It offers the comfort and road manners needed for commuting while adding meaningful upgrades for dirt roads, snow, mud, camping trips, and outdoor travel.
With 9.5 inches of ground clearance, 260 horsepower, 277 lb.-ft. of torque, and up to 3,500 pounds of towing capacity, the 2025 Subaru Outback Wilderness delivers significantly more rugged capability than many buyers expect from a midsize crossover.
2025 Subaru Outback Wilderness Exterior Design and Rugged Styling
The exterior of the 2025 Subaru Outback Wilderness immediately separates it from other Outback trims. Subaru designed this model with a more aggressive appearance that reflects its increased off-road capability.
The Wilderness features distinctive front and rear bumper designs, protective body cladding, black exterior trim, a unique grille, and matte black-finish wheels. Anodized Copper-finish accents provide another visual signature, while the available Geyser Blue exterior color gives the vehicle a particularly recognizable Wilderness appearance.
The SUV also features a matte-black anti-glare hood decal, which is designed to reduce reflected light for the driver. Hexagonal LED fog lights and protective lower-body components further reinforce the vehicle’s adventure-oriented character.
Dimensions also contribute to the Wilderness model’s presence. The 2025 Outback Wilderness measures approximately 191.3 inches in length, 74.6 inches in width, and 66.9 inches in height, with a 108.1-inch wheelbase. Its elevated stance is one of the most important differences compared with the standard Outback.
Rather than simply adding cosmetic accessories, Subaru combines the Wilderness styling with functional upgrades intended to improve real-world travel over rougher terrain.
Turbocharged Engine and 2025 Outback Wilderness Performance
Powering the 2025 Subaru Outback Wilderness is a 2.4-liter direct-injection turbocharged SUBARU BOXER engine producing 260 horsepower and 277 lb.-ft. of torque. The engine is paired with a high-torque Lineartronic CVT featuring an eight-speed manual mode with paddle shifters.
This turbocharged engine gives the Wilderness considerably stronger performance than the naturally aspirated engine used in many other Outback trims. The additional torque is particularly useful when carrying passengers and cargo, climbing steep roads, or towing.
Subaru also gives the Wilderness revised transmission gearing and a shorter final-drive ratio. These mechanical changes are intended to improve low-speed climbing and off-road response. Subaru states that the drivetrain is engineered to improve low-speed climbing capability on grades of up to 40%.
For everyday driving, the turbocharged engine provides responsive acceleration and useful passing power. For adventure-focused owners, it offers additional confidence when the road becomes steep, uneven, or heavily loaded.
The Symmetrical All-Wheel Drive system is standard. Subaru’s AWD layout is designed to continuously distribute power to support traction and stability in changing conditions, including rain, snow, loose surfaces, and uneven roads.
Off-Road Capability, Ground Clearance, and Enhanced X-MODE
The defining feature of the 2025 Subaru Outback Wilderness is its increased off-road capability.
The Wilderness provides 9.5 inches of ground clearance, compared with the standard 2025 Outback’s 8.7 inches. This additional clearance helps the vehicle travel over rocks, ruts, snow, and uneven surfaces with a reduced risk of underbody contact.
The model also features improved off-road geometry. The Wilderness has an approach angle of approximately 20.0 degrees, a departure angle of 23.6 degrees, and a breakover angle of 21.2 degrees. These changes help the vehicle clear larger obstacles compared with the standard configuration.
Underbody protection includes a front skid plate, while the suspension and bumper design support more adventurous driving.
Subaru equips the Wilderness with dual-function X-MODE, including settings designed for conditions such as dirt, snow, deep snow, and mud. The system is engineered to optimize traction and vehicle control when surface conditions become more difficult.
The combination of turbocharged power, AWD, additional ground clearance, revised gearing, and enhanced X-MODE makes the Outback Wilderness particularly appealing to drivers who regularly travel beyond paved roads.
All-Terrain Tires, Wheels, Roof Rails, and Outdoor Utility
The 2025 Subaru Outback Wilderness is equipped with 17-inch matte black-finish alloy wheels and Yokohama GEOLANDAR all-terrain tires. A full-size spare tire is also included, providing additional reassurance during remote travel and outdoor adventures.
Roof-carrying capability is another important strength. The Wilderness uses reinforced ladder-style roof rails with tie-down points and Anodized Copper-finish accents. Subaru lists a 700-pound static maximum roof rail load capacity, making the system suitable for certain roof-top camping setups when used according to manufacturer instructions and applicable limits.
This makes the Outback Wilderness particularly useful for:
- Camping trips
- Outdoor recreation
- Road trips
- Kayak and gear transport
- Roof-mounted equipment
- Appropriately rated roof-top tents
The vehicle also includes practical tow points and cargo-area features designed to support active lifestyles. Subaru’s approach is centered on giving owners flexibility to transition between weekday commuting and weekend exploration.
Interior Comfort, Cargo Space, and Wilderness-Specific Features
Despite its rugged focus, the 2025 Outback Wilderness interior remains comfortable and practical.
The cabin uses durable Gray StarTex water-repellent upholstery with a textured design, contrast stitching, and Anodized Copper-finish accents. This material is particularly appropriate for owners who frequently travel with muddy equipment, pets, outdoor clothing, or adventure gear.
Comfort features include a heated steering wheel, heated front seating, heated outboard rear seats, and an eight-way power-adjustable front passenger seat. A power moonroof is also included.
The Outback’s flexible rear seating uses a 60/40-split flat-folding design, allowing owners to adjust the cabin for passengers or cargo. The 2025 Outback platform offers up to 109 cubic feet of passenger volume, while maximum cargo capacity reaches 75.6 cubic feet with the rear seats folded.
Cargo capacity behind the rear seats is approximately 32.6 cubic feet, giving the Wilderness useful everyday storage space even when carrying passengers.
For families and outdoor enthusiasts, this combination of passenger space and flexible cargo capacity is one of the Outback Wilderness’s strongest advantages.
Technology, Navigation, and Premium Audio
The 2025 Subaru Outback Wilderness includes modern connectivity and infotainment technology designed for both daily driving and longer trips.
A standard 11.6-inch Subaru Multimedia Navigation System serves as the primary technology interface. The system includes wireless Apple CarPlay and Android Auto integration, allowing compatible smartphone applications, navigation, music, and communication features to be accessed more conveniently.
Wireless Bluetooth connectivity and hands-free smartphone operation further support everyday convenience.
For drivers who value premium sound, the Wilderness includes a Harman Kardon premium audio system with a 576-watt-equivalent amplifier and 12 speakers, including a center-channel speaker and subwoofer.
USB-C charging capability is also available across the Outback lineup, helping front and rear passengers keep compatible devices powered during longer trips.
The technology package gives the Wilderness a useful balance: it remains focused on outdoor capability while providing the digital features expected in a modern midsize SUV.
Safety, EyeSight Driver Assist Technology, and Towing Capability
Safety remains an important part of the 2025 Subaru Outback Wilderness package.
The model includes standard EyeSight Driver Assist Technology, which uses advanced monitoring systems to support functions including adaptive cruise control, lane-related assistance, and pre-collision braking features. Subaru states that EyeSight and other safety systems on the Wilderness have been calibrated to account for the model’s increased ride height and off-road modifications.
The Wilderness also includes features such as Blind-Spot Detection, Lane Change Assist, Rear Cross-Traffic Alert, and Automatic Emergency Steering, depending on system operating conditions and limitations.
For towing, the turbocharged Wilderness is rated for up to 3,500 pounds when properly equipped. This allows owners to pull appropriately sized trailers, small boats, and recreational equipment within the manufacturer’s limits.
As with any vehicle, towing capacity depends on proper equipment, trailer weight distribution, passenger and cargo load, and other operating factors.
Is the 2025 Subaru Outback Wilderness Worth Buying in 2026?
The 2025 Subaru Outback Wilderness remains a strong choice in 2026 for buyers who want a vehicle capable of handling both normal daily life and more demanding outdoor travel.
Its major advantages include:
- 260-horsepower turbocharged BOXER engine
- 277 lb.-ft. of torque
- Standard Symmetrical All-Wheel Drive
- 9.5 inches of ground clearance
- Dual-function X-MODE
- 17-inch wheels with all-terrain tires
- Full-size spare tire
- Up to 3,500 pounds of towing capacity
- Reinforced roof rails
- Durable water-repellent StarTex upholstery
- 11.6-inch touchscreen with navigation
- Wireless Apple CarPlay and Android Auto
- 12-speaker Harman Kardon premium audio
- Up to 75.6 cubic feet of cargo space
- Standard EyeSight Driver Assist Technology
For buyers who primarily remain on paved roads, another Outback trim may provide enough capability. However, for drivers who regularly encounter rough roads, snow, mud, trails, camping destinations, and outdoor equipment, the Wilderness upgrades provide meaningful benefits.
Conclusion
The 2025 Subaru Outback Wilderness is one of the most distinctive adventure-focused vehicles in the midsize SUV market. It combines the comfort and practicality of the Outback with genuine upgrades for more challenging conditions.
Its turbocharged engine, standard Symmetrical All-Wheel Drive, 9.5 inches of ground clearance, all-terrain tires, enhanced X-MODE, improved off-road angles, reinforced roof rails, and 3,500-pound towing capability create a package designed for drivers who want to travel farther beyond conventional roads.
At the same time, its spacious cabin, flexible cargo area, water-repellent upholstery, premium technology, and advanced safety features make it practical for everyday commuting and family travel.
For buyers looking for a rugged yet comfortable AWD vehicle in 2026, the 2025 Subaru Outback Wilderness remains an excellent choice for combining everyday versatility with genuine adventure capability.
Frequently Asked Questions About the 2025 Subaru Outback Wilderness
How much horsepower does the 2025 Subaru Outback Wilderness have?
The 2025 Outback Wilderness has a 2.4-liter turbocharged SUBARU BOXER engine producing 260 horsepower and 277 lb.-ft. of torque.
How much ground clearance does the Outback Wilderness have?
The 2025 Subaru Outback Wilderness offers 9.5 inches of ground clearance.
Can the 2025 Subaru Outback Wilderness tow a trailer?
Yes. When properly equipped, the Outback Wilderness has a maximum towing capacity of 3,500 pounds.
Does the 2025 Outback Wilderness have all-wheel drive?
Yes. Subaru Symmetrical All-Wheel Drive is standard on the 2025 Outback Wilderness.
What tires come with the 2025 Subaru Outback Wilderness?
The Wilderness is equipped with Yokohama GEOLANDAR all-terrain tires mounted on 17-inch matte black-finish alloy wheels.
How much cargo space does the 2025 Subaru Outback Wilderness have?
The Outback Wilderness provides approximately 32.6 cubic feet of cargo space behind the rear seats and up to 75.6 cubic feet with the rear seats folded.

Hanging Hardie Siding: A Complete Guide to Installing Fiber Cement Siding in 2026

Anne Kolb Center: Complete Guide to Trails, Wildlife, Kayaking, Tower, Aquarium, and 2026 Visits

Bay Window Installation: Complete 2026 Guide to Cost, Process, Design, and Professional Installation

Pyjamaspapper: The Complete Guide to Comfort, Style, and Better Sleep

Oversight vs Oversite: What’s the Difference? Correct Meaning, Usage, Examples, and Common Mistakes

Oversite or Oversight: What’s the Difference? Meaning, Correct Usage, Examples, and Common Mistakes
 Lifestyle3 months ago
Pyjamaspapper: The Complete Guide to Comfort, Style, and Better Sleep
- Business3 months ago
Oversight vs Oversite: What’s the Difference? Correct Meaning, Usage, Examples, and Common Mistakes
- Business3 months ago
Oversite or Oversight: What’s the Difference? Meaning, Correct Usage, Examples, and Common Mistakes
- Business3 months ago
kompama: A Complete Guide to Understanding Its Meaning, Purpose, and Potential
- Health3 months ago
Aleksandra Plus: A Complete Guide to Features, Benefits, and Uses
- Tech3 months ago
gadgetfreeks.com: A Complete Guide to Its Features, Content, and Growing Popularity
- Education3 months ago
Studiae: The Complete Guide to Academic Excellence, Learning, and Intellectual Growth
- Entertainment3 months ago
Play BattleSquare.com.The Complete Guide to Online Strategy Gaming